Showing posts with label BOSS SHOP: STAW BORG BUILDS. Show all posts

Sunday, May 18, 2014

BOSS SHOP: BORG DESTROYER CUBE & ASSIMILATED ESCORTS PART 4

My adventure into Borgdome continues freely now, as I have dropped out of the SFMA Spring Build Contest. I should of known better than to try to build such a massive and ridiculously detailed model in just three months, with two equally detailed bad ass escorts too...no less!

Now I am going to take my time and have more fun, and do this project the right way, sparing no effort or resource.


The Destroyer Cube is entering the cube stage of the build...Ha, Ha! Some of my Internet buddies mentioned that the model is a triangle, and I just smiled and said; what you have been looking at thus far is the superstructure, not the outer frame. I set this second dry-fit arrangement up, for another preview of how the lighting will look, with the exterior upper hull in place.


The outer-hull templates are cut and ready to go. The first thing I wanted to do is to dry-fit them, as pictured. I of course made sure to design and draw them to fit properly, but it is always good to check the parts before you start gluing things together.


The cuts for the base and top of the cube came out almost perfect, since I measured them by a set of 12x12 inch tiles.


I cleaned the tiles with a scrub pad to get a fine texture all over the plasticard. The glue will have a fine rough surface to hold to.


Under the weight of the tiles and my table side trashcan, the plasticard sections set very nicely. They are as sturdy as the floor tiles themselves now.


I recently received my next supply order to continue working on the Destroyer. I have also decided to make a Sphere next so I can use some of this for that model too.

PART THREE

BORG Boss out!

Friday, April 11, 2014

BOSS SHOP: BORG DESTROYER CUBE & ASSIMILATED ESCORTS PART 3

I have begun the main work on the outer-frame this week, which is the most important part really, as it will be the first layer of detailing...The Eye-candy. I have received my new supplies, and I can now continue building this monstrosity without further interruptions, which means construction is now being done in deadly earnest... Ha, Ha, Ha!!!


I have already made illustrations for the Exterior Hull Armour patterns for this month's work. These armour sections will cover most of the outer-frame. I do not like to make the modeling harder than it needs to be to achieve my goals. Scribing is fine most of the time, but not for a large model like this Destroyer Cube of mine.  I need to have deeper layers and more pronouncement in the raised edges, or everything will just get lost in the myriad details.


This image includes the basic under-pinning template for the outer hull and it's counterpart detailing templates, that will be used to complete the main construction of the outer hull.

All of these templates count as The Magic for this part of the model...Ha, Ha! The final construction will include secondary weapons and extra bits of detail. The Borg have a randomness to their construction, and the final detailing will reflect that.


I am using Plasticard for the large solid parts of the construction; .20MM to build the armour sections, and .40MM  for the base and the top of the Destroyer.


The first set of patterns are trimmed and ready to be applied.


The patterns are glued to the .20MM Plasticard and ready to be cutout. I went over them all very firmly with the crisp card edge, using the newspaper to protect them from being worn or otherwise damaged by this setting process. They will stay in place long enough to complete the cutting I think...


For some reason I have come to know this little lady as PreazieAnne, now that she is no longer a nice girl...Ha, Ha!

PART TWO.

PART FOUR.

BORG Boss out!

Tuesday, April 1, 2014

BOSS SHOP: BORG DESTROYER CUBE & ASSIMILATED ESCORTS PART 2

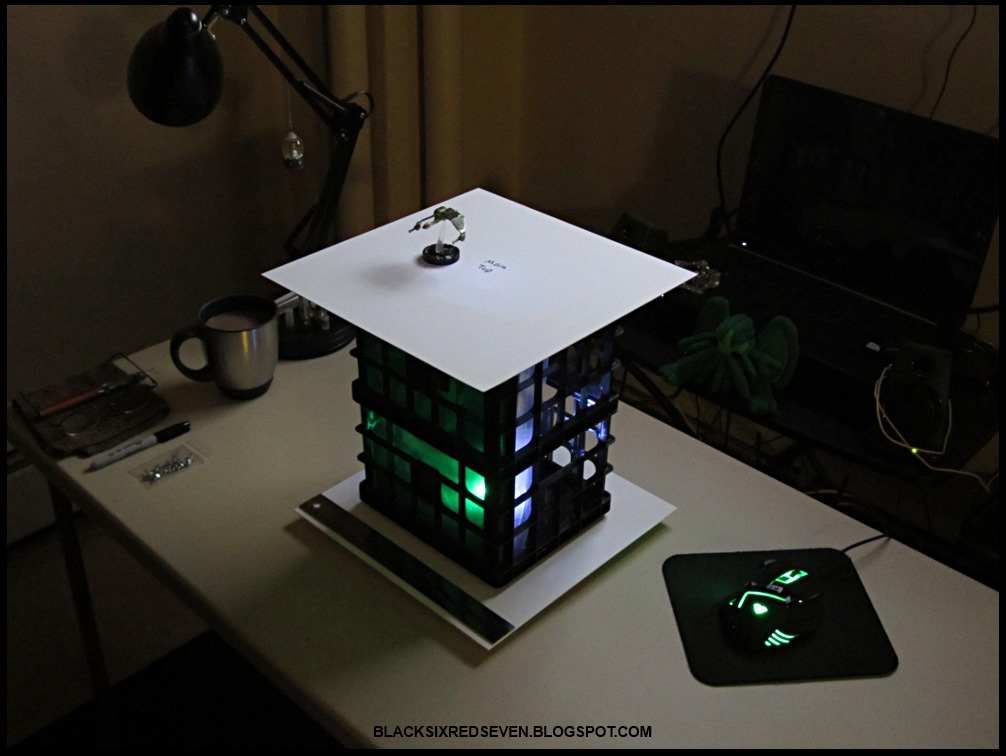
Now that I have the superstructure of The Destroyer Cube done, I have focused on getting the secondary structures built. The secondary structures include all of the framework for the Destroyer's outer hull and the interior hanger-bays.


The crates have already been prepared, now it is a simple matter of making the hangers in such a way that they will easily plug into their places within the superstructure.


I have a lot of main-parts and detail-bits for the hangers. This part of the Destroyer is good ole fashioned modeling fun...how much of the cool stuff (detail) can I get into them, and keep everything looking good in relation to the scale?


The tools...I love 'em...Ha, Ha!


The main components of all four Hanger-bays (The Magic) comes from the somewhat hard to find  Platformer Hex set.


I always use a nice damp black hand-rag when I am making a mess, because the bits and shavings get stuck there as neat as you please, and this makes the work less of a hassle for me. When I am done being messy all I have to do is shake the rag over the trashcan then rinse it in warm soapy water, wring it out and fold it, and I am back in business again.

This rag-work as I call it, is something that I have learned to do over the years, to keep mess to a minimum. It is how I like to work, as the debris do not get in the way, and I can wipe the tools off as I go.

The tiny holes for the lighting are all done with a sharp sowing needle, as this is a much easier way for me to control the hole sizes, and that needle will not break like a fine scale drill bit often does. If I need to clean any of the holes out I come back with a drill bit and simply ream out the pin hole, and there is almost no stress on the drill.


I have also figured out exactly how I am going to build the main and exterior frames; the parts that will make the Destroyer a cube. I have to wait until next week to continue this work however as I have limited stock in my supply bins, and had to order several sets of large ABS Rod to complete these sections.


I also started to work on the TOS-A as the first Assimilated Escort model, since I am short on large ABS Rod. This is a nice set of parts for the start of this cool little model. I should be able to get the new look I want for her working from here.


I almost felt bad about burning then carving and shaving this little lady...but it had to be done.

I am going to make the Borg-tech details three layers deep on all of these models.

On the Destroyer that is the interior, main, and exterior frames.
On the Assimilated ships this is being done by making precise panels, to show the tech details just below the original ships hull.
The secondary details will be on the outer hull, and to finish the effect extra Borg paneling, devices, and weapons will be modeled in fine detail above the original exteriors of the  ships.


I have the last batch of big materials ordered. Now I am going to leave the main frame for a bit and continue work on the TOS-A this week, along with the Hanger-bays, while I wait for my new supplies to arrive.

PART ONE.

PART THREE.

BORG Boss out!

Sunday, March 16, 2014

BOSS SHOP: BORG DESTROYER CUBE & ASSIMILATED ESCORTS PART 1

I started building The Destroyer Cube this week. This first part of the build diary represents about nine hours of hands-on work.
This time does not of course account for the many additional hours spent in laying out the base materials, and considering what would work best to achieve my goals, which amounts to mentally building areas of the model over and over again, to get it right. I always do this before actually working with the parts.


The super structure is a pair of plastic storage mini-milk-crates, which are perfect for my design. Midwest brand green PVC sheet and a nice Tamiya 4x6" display base, with my beloved little Tea-light LEDs complete the core materials.


This is the magic...Ha, Ha...everything else is just extra sparkle.


I like to see some scale indication when I look at models online...it is a pet-peeve I suppose. The Destroyer will be about an eleven inch square when I am done.


I will be using from two to four of my Tea-lights to produce that creepy green inner-glow effect for the final model. I am not going for a lighted look, but rather an evil green glow; The Corpse-light described by professor Tolkien.


I cut a precise amount of plastic from the milk crates to make the overall superstructure fit together cleanly and to space the supports evenly.


This looks simple, and it is of course, but you have to be clear about what you are trying to achieve and you have to be mindful of what you are doing or you can very easily cut yourself.


Slow and firm shaving down of the rough saw marks left in the plastic is a time consuming process. A good Dremel tool would work faster, but I like to shave and file, because it is easy for me to control the manual hand-tools.


I am going to save much of the leftover plastic for use with some other projects.


Now the superstructure is nice and even, and the openings for the hanger-bays are ready for secondary structures to be built.


PART TWO.

BORG Boss out!

Monday, March 3, 2014

BOSS SHOP: BORG DESTROYER CUBE & ASSIMILATED ESCORTS PREVIEW

The SFMA Big Spring Build Contest opened on the first. I am building a Borg Destroyer Cube with Assimilated Federation Escort Ships.
This is the first official Boss Builds Article for this project. We all had to post a time dated image of the parts to verify that no one had started to do any work on their entries.


I am currently organizing the parts to start the Destroyer Interiors. I will be posting regular updates for this project...

Build Diary: PART 1

BORG Boss out!

Tuesday, February 25, 2014

BOSS SHOP SFMA SPRING GROUP BUILD PROJECT OVERVIEW: BORG SHIPS

With the big SFMA Group Build coming up in a few days, I figured I would post a little overview of my entries.


This is going to be a fun project I think...

Project Preview

Video Borg Boss out.